Oldskooler Ramblings

the unlikely child born of the home computer wars

How to shoot vintage computer product photography for YouTube (or anything)

Posted by Trixter on November 14, 2023

On November 1st 2023, I released the first part of a 4-part series on the IBM PCjr on YouTube. The opening shot is a slow dolly push into the frame, showing an IBM PCjr’s startup screen. It is some of the best product footage I’ve ever shot, perfectly calibrated and exposed, showing the CRT’s 16 colors as accurately as I’ve ever seen in 4k footage. You can check out the opening shot (and hopefully the entire video!) here:

Someone mentioned to me that at first they thought it was rendered CGI, which is one of the best complements I’ve ever received. :-)

While I’m not a professional photographer, I’ve been studying videography for about a decade, and gotten some tips from experts that include an Emmy-award-winning cinematographer, so I feel somewhat qualified to advise on the process of shooting vintage computer product photography/video. I’d love to see better vintage computer videography on YouTube, so here’s my process, and I hope it helps someone.

Misconceptions

There’s a lot of bad advice out there, so let’s start by tackling some misconceptions:

Color grading is a stylistic step, not a correction step. Color grading is the process of adjusting and enhancing the colors of a video to achieve a desired visual aesthetic or mood, but in order for grading to work consistently, the input footage needs to be perfectly exposed and neutral. The procedures in this blog post will help you get your footage to be as close to neutral as possible out of the camera, which you can then color grade if you want to.

Gear Doesn’t Matter — but whatever you use, it must have manual controls for aperture, ISO, and shutter speed if you want to control the process. If any of these are outside of your control, then you probably need to revisit your choice of camera or cell phone. (Most modern iphones and android phones either come with a “pro camera” app, or you can buy one, or try an Android open-source solution such as Open Camera.

Achieving neutral footage via best practices

There is a fairly consistent workflow you can use to achieve neutral and balanced video footage every time. As mentioned above, it requires manual control over several camera settings, so if you’re using a full-automatic camera, or a cell phone without a dedicated “pro camera” app, not all of these steps will apply to your gear, but following as many of them as you can will certainly help.

Also, it is best to follow these basic photograph steps in order. ISO, aperture, and shutter speed are all points on the exposure triangle, but two of them affect video much more than photography, so it’s important to set them in the correct order to prevent unintended artifacts in video.

Let’s go! Here’s the basic process I follow after I set up my scene:

1. Adjust lighting in the real world to get the look you want. Vintage computing enthusiasts understand “garbage in, garbage out”, and the same applies to videography. You can’t fix everything in post, so make sure you have enough light. Not sure if you have enough light? Add more light! The more light you add, the more photons hit the camera sensor, which translates to less noise in the final video. (As a bonus, additional light sometimes fills in harsh shadows.)

2. Set camera to full manual. We need individual control over ISO, aperture, and shutter speed. Preferably, also manual white balance.

3. Set ISO to the base ISO of your camera. This reduces noise in the video. Think of ISO as amplification, or gain, added to the signal registered by the camera sensor: Higher settings produce more noise, just like turning up the volume on a vintage stereo system adds more noise and hiss. Base ISO settings differ from camera to camera, and the base setting is usually NOT the lowest ISO setting of 50 or 100, so you need to check your camera’s manual (or, sadly, the internet) to determine the correct setting. For example, on my Panasonic GH5s, the base ISO is 800 for its LOG picture profile, and ISO 400 for all other picture profiles. (On my Panasonic G9 II, the camera limits the low end of ISO adjustments to its base of 400, and won’t let you go below that. I find that very helpful, but I think that default behavior can be toggled.)

Some cameras have two base ISO settings that produce the lowest noise; for example, the Sony A7 IV has multiple base ISO settings depending on the profile. You can experiment with both settings to see which works best for the amount of light you have available in your scene.

4. Set shutter speed to match the frequency of your lighting. This eliminates subtle “banding” in the picture that results from a mismatch between shutter speed and light flicker. There are really only two settings, 1/50 or 1/60, and you should pick whichever matches the AC frequency of your mains voltage. For Europe, this is 1/50; for North America, this is 1/60. (European users might have some trouble getting exactly 1/50, as that is not a traditionally common shutter speed; pick 1/48 instead as a compromise.)

If you’re using professional flicker-less light rigs, then you don’t need to worry about mains/electrical flicker, and can set the shutter angle to something that looks more natural. Set your shutter angle to 180 degrees if your camera has a “shutter angle” setting. If it doesn’t, set it to double your shooting framerate; for example, if shooting video at 24 frames per second, set shutter to 1/48.

5. Adjust exposure using the aperture. With our ISO and shutter speeds set, the only way we can adjust exposure is by adjusting how much light entering the lens hits the camera sensor. If the picture is too bright, stop the aperture down (ie. go from f/4, to f/5.6, to f/8, etc.) until nothing is clipping in the whites. If too dark, stop the aperture up (ie. go from f/8, to f/5.6, to f/4, etc.) until it nothing is crushed in the shadows. If it’s still too dark after opening the aperture all the way, then add more light (see “Adjust lighting” above).

How to check exposure? If your camera supports it, turn on a “levels”, “histogram”, or “waveform monitor” display in your camera’s settings (or cell phone’s “pro camera” app). If your camera doesn’t have that, enable the “zebras” camera setting with the threshold set to 95% or 100% to ensure nothing is clipping; with this setting on, moving “zebra outlines” will appear on-screen where clipping is occurring. (And if your camera doesn’t have either of these monitoring features, consider getting a better camera.)

6. Set white balance in camera. This is to ensure nothing has a color cast, and that white is truly white. Use your camera’s function to set white balance, which usually involves putting a white balance target in front of your camera so it can calibrate itself. Ideally, use an “18% grey card” (they’re cheap on B&H or Amazon), but you can also get by with a pure white sheet of paper.

7. Focus on your subject. If you’ll be moving the camera or subject a lot, or you know your camera uses a superior focus system like phase detection, it’s ok to use autofocus. If you are not moving the camera or subject significantly, or your camera uses an inferior focus system for video like contrast detection, use manual focus instead.

You don’t have to be scared by manual focus: If your camera supports a feature called “focus peaking”, you can enable it to make in-focus areas easier to see. But you don’t have to trust your eyes using manual focus; your camera should support a “tap to focus” feature when in manual focus mode, where it will focus exactly where you tap on the camera’s flip-out screen. (Just remember that tap-to-focus only sets focus once — it will not track your subject and continually adjust focus.)

8. Put a color chart in front of your subject for a few seconds when you start shooting video. This provides a known good reference to further correct any color issues later during editing. The Calibrite (formerly X-rite) ColorChecker Passport Video is a great choice, as its “video” chart can be used directly by some editors, like DaVinci Resolve, to automatically color-correct any subtle differences from neutral in the footage. If using other video editors, both the MBR Color Corrector III plugin (Premiere, After Effects) as well as Cinema Grade (Premiere, Final Cut) can also use this specific color chart. Simply apply whichever process you have to a frame that contains the color chart, and you will notice the footage will subtly get more accurate; you can then cut out the piece with the color chart in it so it doesn’t show up in the final result.

What about picture profiles?

As long as you’re not using a “special effects” profile, anything called “standard”, “natural”, “rec709”, or similar will be just fine. The actual picture profile doesn’t matter as much, because as demonstrated above, we use the color chart shot to correct the footage to a neutral color balance anyway. But if you’re not sure, take some time to test these procedures with all of your picture profile settings, to see which works best. For example, some picture profiles have different contrast levels than others, even if they don’t change the colors, so you may want to find a low-contrast profile to fill in the shadows if you have trouble lighting your scene.

You don’t have to color-grade

Now that you have color-corrected neutral footage, you may be artistically tempted to color-grade your footage. While it can be fun to make video look like your favorite movie or tv show, stop first and think about what your video is trying to do: If you’re trying to convey a certain narrative, color grading might make your footage more impactful and dramatic… for example, going for earth tones if simulating a 1970’s flashback. But when it comes to historical accuracy, the last thing I want to do is color my footage artistically. For example, CGA has 16 distinctive colors; I want everyone to know exactly what those colors looked like, in ideal conditions. So what I put on YouTube is the neutral, balanced footage out of the camera with very few adjustments, and certainly no color grading. I want people to see what the machines actually look(ed) like.

It is entirely possible I am a moron

I hope this helps you with your own product photography — but if you’ve had better results with a different process, I’d love to read about them; post your experiences in the comments.
Posted in Uncategorized | Leave a Comment »

How I got into tech

Posted by Trixter on September 13, 2023

Recorded something for Hacker Public Radio when their queue was getting low: How I got into tech.

Posted in Uncategorized | Leave a Comment »

In which Trixter rambles about the IBM PC for 5 hours

Posted by Trixter on July 15, 2023

Did I forget to mention that I co-hosted four episodes of the Floppy Days podcast 18 months ago? I’ve become somewhat of an expert on the IBM PC over the decades, so when Randy Kindig wanted to cover the 40th anniversary of the IBM PC, he reached out to me to help with tech research and modern-day hobbyist developments. Along the way, he asked if I could co-host those episodes, and having a face for radio, I agreed.

We didn’t want to leave anything out, so we covered everything and broke it up into four parts, which aired from December 27th 2021 to March 31st 2022:

https://floppydays.libsyn.com/floppy-days-109-the-ibm-pc-5150-tech-specs

https://floppydays.libsyn.com/floppy-days-110-the-ibm-pc-5150-part-2-with-jim-leonard

https://floppydays.libsyn.com/floppy-days-111-the-ibm-pc-5150-part-4-with-jim-leonard

https://floppydays.libsyn.com/floppy-days-112-the-ibm-pc-5150-part-5-with-jim-leonard

I recorded all of my parts locally, but Randy was happy with the stream quality, so he used the stream as the audio. As for the content, over the series it goes from historical and technical, to modern topics such as how to get started, where to find systems, modern homebrew hardware, networking, etc.

Give them a listen on your next cross-country trip to a vintage computer festival.

Posted in Podcast, Vintage Computing | Leave a Comment »

MartyPC: Finally, a cycle-accurate IBM PC emulator!

Posted by Trixter on July 5, 2023

When my crew and I wrote 8088 MPH and Area 5150, we had a secondary goal other than to amaze: It was to spurn emulator authors into improving the emulators. Anyone who grew up with a 4.77 MHz system understands that most emulators just don’t play pre-1985 games very well, as most of them were written for that target speed and are unplayable on anything faster. DOSBox is woefully inaccurate for this era of PC gaming — which is why I think most people are trying to forget it, but that would be a shame, as there are some wonderfully surprising action games for this class of system.

MartyPC rises to that challenge, and because the author is as tenacious as we are, he didn’t stop until it ran Area 5150 perfectly. You can even see it single-stepping through the demo’s bit-banged video mode here:

MartyPC single-stepping through a portion of Area 5150

Viler has an amazing write-up on what MartyPC does well beyond just our demos. Highly recommended reading.

It took 42 years, but we finally have a decent 4.77 MHz 8088 + CGA emulator. And if you’re into that sort of thing, you can even run it in your web browser.

Posted in Uncategorized | 1 Comment »

Protected: The semantics of discourse

Posted by Trixter on December 30, 2022

This content is password protected. To view it please enter your password below:

Posted in Uncategorized | Enter your password to view comments.

How to transcode UHD 4K HDR rips for lower bandwidth to an LG C8 OLED via Plex

Posted by Trixter on April 29, 2022

(This post has been edited with new information)

The LG Cx series of OLED TVs have terrible network chipsets in them: They can do more than 100mbps over 5GHz wifi, but can only do 100mbit/s over ethernet (my experiments with a USB-to-ethernet adapter were mixed). So what happens if you want to stream to your TV over ethernet because you can’t use wi-fi?

Included below is an ffmpeg script I’ve used to transcode UHD 4k blu-ray rips down to a bandwidth that can be handled without trouble using my LG C8’s ethernet connection, which I used during a period when I was unable to use the TV over 5GHz wifi (since corrected, thankfully). It leverages a modern nvidia card to do the transcode without any CPU usage, and preserves the HDR10 information. The end result is worse than the source if you pixel-peep, but if you’re sitting 10 feet away from your projector, it’s perfectly fine — and it’s certainly better than a blu-ray rip of the same material. Here’s the script:

REM This creates a Plex Versions proxy that preserves as much quality
REM as possible without exceeding an LG C8's ethernet 100mbit/s capabilities.
REM Call this batch file from the plex directory containing your main movie.
REM
REM The 120M bufsize represents a 3-second window @ 40M vbr that a max of 60M
REM can be sustained.
REM

mkdir "Plex Versions\LG C8"

for %%a in ("*.*") do ffmpeg -find_stream_info -hwaccel auto -i "%%a" -map 0 -c copy -c:v hevc_nvenc -pix_fmt p010le -tune:v hq -preset:v p7 -color_primaries bt2020 -color_trc smpte2084 -colorspace bt2020nc -spatial_aq:v 1 -temporal_aq:v 1 -b_ref_mode middle -profile:v main10 -tier:v high -b:v 40M -maxrate:v 60M -bufsize:v 120M "Plex Versions\LG C8\%%~na.mkv"

Posted in Digital Video, Entertainment, Technology | Leave a Comment »

The Care And Feeding of the M24/6300/6060/1600

Posted by Trixter on December 9, 2021

The Olivetti M24 was a fantastic PC compatible that was double the speed of the IBM PC, had built-in expansion ports, a smaller footprint, and special hi-res graphics, all at a price cheaper than the original PC. AT&T brought the M24 to the USA and sold it as the AT&T 6300, and it was very popular over here as an alternative to the PC. (Xerox also imported it to the USA and sold it as the Xerox 6060; in France, it was sold as the Logabax 1600.)

As the vintage computing hobby continues to grow, a lot of people have been coming across these and wondering if they should take the plunge. While the 6300 is among my most favorite systems ever made, I usually don’t recommend it for beginners because it uses a proprietary keyboard and monitor, and if you don’t have both, it can be extremely difficult to adapt a traditional keyboard and monitor for use with the system unit. But, if you see one for sale for cheap, and it has everything and works, I’d like to offer some modern tips on the care and feeding of these unique beasts. These hints can help get your system up to speed as a useable and practical member of your collection. (Note: When I write “6300”, I’m talking about all versions of the Olivetti M24, as they were identical hardware.)

Preparation

First and foremost: If you have a working system, IMMEDIATELY power it off, open it up, disassemble it, remove the motherboard from the bottom of the system, and carefully desolder and remove the barrel battery. It’s not needed to operate the system, and can only cause permanent failure if it corrodes the motherboard. (You can try to snip the battery off with snips, but I have broken a motherboard this way so I usually recommend the gentler option.)

If your system boots up with a ROM BIOS other than 1.43, flash the 1.43 ROM BIOS and install it. It fixes some bugs. There is an associated PAL that came with the ROM BIOS upgrade kit, but in my experience it wasn’t necessary to operate the machine (some of the hardware support introduced by 1.43 won’t work without the updated PAL, but the rest of the BIOS enhancements will work). One thing the upgrade gives you is the ability to run Microsoft Word for DOS 4.x and higher in graphical mode using the 6300’s high-res graphics.

If you don’t care about running GeoWorks Ensemble, replace the 8086 with an NEC V30 for a 20% speedup. Ensemble will no longer work for some reason, but everything else will feel zippier.

Storage

If you want to add an XT-IDE, you need to use any XUB BIOS made in the last 2 years or newer, because it has speed-optimized code that deals with the bus issues of the AT&T. The speedup is minimal, so if your XT-IDE card works as-is, it’s using the slow compatible mode and you may want to leave it that way so you can use it in any system.

Bus issues? Yes, unfortunately on the 6300, doing a word-sized read or write will accidentally transpose the values. This causes some software to break. A “bus correction kit” was available that fixed this, but they are rare. An effort on the VCF forums was made to reproduce them, but I don’t know where that project landed; sorry. If your XT-IDE card is using the wrong BIOS that tries to do word-sized reads, you may see it start up with endian-swapped lettering when it identifies the CF card: Instead of your transcend CF card showing up as “TRANSCEND”, you’ll see “RTNACSNE D” and then it will hang. Flashing a new XT-IDE XUB BIOS using the most compatible options will fix this.

You can put any 3.5″ drive in the system and get free 720K DSDD support by ensuring you have a DEVICE=DRIVER.SYS line in CONFIG.SYS with appropriate params for 720K. But that’s it; the built-in controller does not support high-density drives. You’ll have to get a replacement floppy controller and disable the onboard one if you want to do that, but IMO it’s not worth it when XT-IDE makes transferring files with modern systems easy.

Networking

Intel Etherexpress 8/16 network cards don’t work in an AT&T because of the bus issue mentioned above. Xircom parallel-port ethernet adapters work fine, albeit slowly. I’ve used other period-appropriate ethernet cards with success, although I prefer to use anything with an RJ-45 connector as I find 10 base-t ethernet transceiver dongles cumbersome.

Keyboard

The keyboard, and it’s plug and signaling, are proprietary. It is nearly impossible to use a different keyboard. There is someone on the VCF forums who came up with a hardware design to translate the signaling between the 6300 keyboard port and a PS/2 connector, but I also don’t know where that project landed, sorry.

Display

The display adapter is proprietary; it outputs a high-res 25 KHz horizontal signal, but that can only be used with select AT&T monitors. It also provides voltage (!) to power AT&T monochrome monitors. Trying to replace it with something like VGA is difficult and frustrating, especially if you don’t have the bus conversion kit mentioned earlier. My advice is to try to keep the original monitor running, as that is part of the system’s charm.

If you can’t find a working monitor, you can use an RGB2HDMI and a custom adapter to translate the signal to HDMI. It’s an RGB TTL signal that runs at 56Hz vertical and (if memory serves) 25KHz horizontal, and provides a 640×400 display.

Speaking of that display, it had more support than people realize. You can run Windows 3.0 in real mode, Geoworks Ensemble, and GEM in 640×400 if you like graphical environments.

Power

The power supply is very odd (24 V?) and is difficult to repair because it is built in two halves. It also houses voltages that can injure or even kill you if you open it up and try to repair it. Be careful, and refer to the Olivetti M24 technical reference or the 6300 Sams Computerfacts to know what you’re getting into.

Enhancement

The dimensions of the system are proprietary; they will not take replacement motherboards. In fact, the motherboard and the bus interface are two separate backplanes that interface through the display adapter (you read that right: The display adapter) so it’s impossible to adapt the case to house anything else.

I do not know which accelerator cards (ie. 286 or 386 speedup cards) work in a 6300. My guess is that most of them would not work because of the aforementioned bus issue and/or expecting an 8088 when the system uses an 8086. The only accelerator cards that are likely to work are those that didn’t use a ribbon cable to replace the CPU, such as Applied Reason’s “PC-elevATor” board.

Most, if not all, 8-bit sound cards work just fine in a 6300 as they didn’t require word-sized accesses. I recommend an 8-bit Sound Blaster clone, or a Sound Blaster Pro. DMA on those cards works fine and you can even play MOD songs on a 6300 at 24Khz or higher with one. You can also use an LPT sound dongle (ie. Covox) as there is nothing particularly odd about the 6300’s built-in parallel port.

You can put EMS cards in 6300s and they work. EMS boards are slow in the 6300 unless you get the AT&T-specific, AST-made, EEMS 3.2 board, which uses the proprietary 16-bit wacky interface unique to the AT&T, and then the EMS memory is the same speed as the main memory (and enables some other neat tricks, like expanding lower DOS RAM from 640K to 736K). Desqview also runs very well with this board installed, although a regular EMS board helps with that too.

Posted in Vintage Computing | 1 Comment »

My IBM PCjr Print Media Archival Project

Posted by Trixter on April 25, 2021

While I’m not the #1 PCjr fan in the world — that honor goes to Mike Brutman — I consider myself in the top five. I’ve owned, used, and programmed for the PCjr for decades. A flawed problem child, the PCjr was an underdog that never fully met IBM’s expectations, but it succeeded at something much greater: With its 16-color graphics, 3-voice sound, and early support from Sierra, it showed the world that PCs could be treated seriously as viable gaming machines. Because of this, I’ve evangelized the PCjr, given extended PCjr history presentations, and even set up comprehensive PCjr exhibits. So you could say I’m a PCjr superfan.

Along these lines, I’m happy to announce the results of a years-long scanning project: A gigantic cache of IBM PCjr resources: Books, magazines, newsletters, catalogs, adverts, and technical and repair information. So what does that mean?

Books

Let’s start with over 20 PCjr-specific books, covering topics from introductions to personal computing, all the way down into technical details about how the PCjr’s enhanced features work. You can pick these up here: http://ftp.oldskool.org/pub/drivers/IBM/PCjr/Books/

Newsletters

There’s also a complete run of the Eugene PCjr Club newsletter (over 135 issues), as well as a complete run of jr Newsletter out of Connecticut (75% of which are new 600 DPI scans). There were at least 32 (!) different PCjr clubs during PCjr’s lifetime, but only a few had long and comprehensive newsletters as these two. The Eugene PCjr Club was the longest-run active PCjr club in the world, starting in 1984 until disbanding in 2002, and from 1985 onward they had their own newsletter.

Reading these is not only a nostalgic trip back in time, but also chock full of surprisingly relevant information to vintage computer hobbyists today. They continued coverage where the magazines left off, reporting on which new hardware add-ons and modifications you could perform on a jr, iincluding a potential 286 upgrade, VGA upgrade, hard drives, and more; they also had many tips on getting software to run on the not-quite-compatible PCjr. You can pick up the entire Eugene PCjr Club and jr Newsletter runs, as well as other PCjr newsletters (check out The Orphan Peanut, prepared completely on a 768K PCjr!), here: http://ftp.oldskool.org/pub/drivers/IBM/PCjr/Newsletters/

Heck, there’s even 21 issues of The Junior Report, a newsletter from “The PCjr Club” which I never knew about during their heyday, which surprised me since they were held in Schaumburg, Illinois — practically in my back yard at that time.

Magazines

I’ve also managed to archive complete runs of most magazines that were dedicated only to the IBM PCjr, such as Peanut, PCjr Magazine, and even PCjr World, a special insert included in PC World magazine for a few issues. (These jr-specific magazines are rare, and I acquired them at considerable expense, so please give a moment of silence to thank them for their sacrifice.)

Additionally, I’ve managed to scan very many magazine excerpts from other magazines that covered PCjr. Some of these excerpts were quite good and comprehensive, from using PCjr as a cheap scientific data acquisition platform, to detailed accounts of what was happening with PCjr during its original time period. You can grab the magazines and excerpts completed thus far here: http://ftp.oldskool.org/pub/drivers/IBM/PCjr/Magazines/
(I’m still working on the complete run of “COMPUTE! For the PC and PCjr” as well as “jr”; if you can lend or donate issues for scanning, please let me know.)

Catalogs

Finally, I’ve archived some catalogs, which can serve as a collector’s checklist of all the PCjr-specific hardware and software it was possible to use with your PCjr. The PC Enterprises catalogs list some esoteric stuff that is nearly impossible to find, and IBM’s The Guide has some gorgeous product shots of PCjr and other hardware. There are also catalogs from Computer Reset, Paul Rau Consulting, and others. Pick up all the catalogs here: http://ftp.oldskool.org/pub/drivers/IBM/PCjr/Catalogs%20and%20Price%20Lists/

What’s in it for me?

All of these are high quality scans and fully text-searchable. Advanced techniques were used to ensure the highest quality possible at reasonable sizes. You will not find any JPEG “mosquito noise” compression artifacts, screened printing moire patterns, or unreadable text in these scans.

While I originally did this for new PCjr owners so that they could get up to speed quickly, there is a lot of nostalgic waxing and trivia for grizzled old collectors too. For example, there’s references to third-party hardware and modifications that I never knew existed until I started this project (a reset button, an SVGA sidecar, 286 upgrade, quad-cartridge-port adapter, EMS sidecar modification, etc.), esoteric program patches to get equally esoteric software working on PCjr, and even trivia like what the “L” port was originally meant to be used for.

Thanks

I’d like to thank Louie Levy for donating most of the Eugene PCjr Club newsletters to me for this project, and L. Teague for many jr Newsletters, PCE catalogs, and other materials.

FAQs:

Q: Can I ______ these files?
A: I don’t care what you do with these files, as long as you’re sharing and enjoying them and don’t utterly destroy my bandwidth. Please leech responsibly, preferably at 512KB/s or less.

If you want to upload these to The Internet Archive, go for it; just let me know what the collection links are so that I can edit this post and link to them. Someone has already done some of these files piecemeal, without acknowledging my efforts, but that goes with the territory; we (archivists) are used to it. If you want fame and fortune, being an archivist is a pretty terrible way to go about it.

Q: What is your scanning process?
A: Funny you should ask.

Q: The PDFs are great, but–
A: Don’t worry, OCD friends: The original physical pages are being stored off-site, and I also made a copy of the raw unprocessed 600 DPI scans if newer and better technology becomes available.

Posted in Technology, Vintage Computing | 2 Comments »

October Horror Movie Challenge Results

Posted by Trixter on October 31, 2020

Every October, I allow myself to get all of the horror, gore, and halloween-themed movie-watching out of my system. For literally no reason or benefit, I usually challenge myself to watch 31 such movies, one for each day of the month. This year is the first year I succeeded, likely due to a mixture of the pandemic limiting excursions, and also because horror movies are a light and breezy diversion from the real-life hellscape that is 2020.

So what did Trixter watch? Here’s the list, in chronological order of release date (this was not my viewing order, which is much less interesting):

TitleYear
The Thing 1951
The Premature Burial 1962
Theater of Blood 1973
The Exorcist 1973
Haunted: The Ferryman 1974
Trilogy of Terror 1975
Halloween 1978
Alien 1979
Phantasm 1979
Humanoids from the Deep 1980
The Thing 1982
The Beast Within 1982
Cat People 1982
Aliens 1986
Invaders from Mars 1986
April Fool’s Day 1986
Predator 1987
Phantasm II 1988
Cellar Dweller 1988
Scarecrows 1988
Death Spa 1989
Dr. Giggles 1992
Leprechaun 1993
Phantasm III 1994
Ice Cream Man 1995
From Dusk ’til Dawn 1996
Phantasm IV 1998
Shaun of the Dead 2004
Night of the Living Dead: Darkest Dawn 2015
Phantasm: Ravager 2016
Hubie Halloween 2020

And a special bonus that I completed just now: Night of the Living Dead (1990) viewing party with three of lead actors, giving live commentary. Was very fun, first time I’ve ever done that.

Posted in Entertainment | Tagged: , | Leave a Comment »

How to reasonably archive color magazines to PDF

Posted by Trixter on July 14, 2020

During a conversation with one of my archival collectives, the topic of archiving color magazines came up. Our goal was to distribute scans of the material as PDF, primarily because of its ubiquity of viewing software, but also because OCR’d text could follow the images, making the magazine searchable without requiring the user to perform OCR. However, most of us haven’t started archiving our magazines, because it’s an extremely daunting task. Color magazines are notoriously annoying and difficult to scan to digital form because:

  • Most were printed using screened printing, whose tiny high-contrast dots hurt compression ratios, and produce moiré patterns when scanning at, or resizing to, lower resolutions
  • The high number of pages in color magazines (300, 400, or even 500 pages per publication) makes using a flatbed scanner a tedious process, as well as resulting in a very large set of data per magazine (if preserving quality is a concern)
  • Some magazines print almost all the way into the binding, leaving only a few millimeters of margin at the gutter, which prevents traditional book scanners, both flatbed and camera-based, from capturing the inner 1 CM of printed material

However, we’re in possession of several magazines that the original publisher hasn’t archived and aren’t available in the wild, so we decided to experiment with various scanners, software, and methods to see what was possible, while staying within the limits of what is practical.

While everyone has their own views on what’s important (size vs. quality, speed vs. accuracy, effort vs. volume, etc.), I came up with a set of rules and processes for myself that I’ll be following, and would like to share them. I held myself to the following goals:

  • PDF file sizes should not exceed 1MB per page on average. In 2020, and for the next 5 years at current broadband capacities and growth, a file size of 500MB for giant magazines, or 100MB for modest ones, is appropriate. This isn’t because of total size — storage is cheap — but rather because of transfer rates. I could easily scan a 500-page magazine to 30 GB of TIFF files (which I’ve done many times), but it’s not practical to share 30GB per magazine with online repositories. And besides, I’m not made of money, and some online repos may balk at an attempted upload of 7 TB (approx. 20 years of a large magazine’s print run).
  • Pages should be scanned at 600 DPI. This preserves the screening which can be dealt with later if necessary. It also ensures that very fine print will not only be legible, but able to be OCR’d. (Even if 300 DPI material is eventually needed for extremely large publications to stay under 1GB, the 300 DPI material can be obtained by resizing the 600 DPI material, instead of re-scanning the entire document.)
  • No matter the amount of processing, text should never dip below 600 DPI. This is less of a preference and more of a way to ensure that very fine print, such as a magazine’s masthead/impressum, is legible.
  • All screened material should be de-screened. If the scanning system has a proper de-screening option (a real one that asks for the LPI of the source material, not just a dumb blur filter), it will be turned on during scanning (and the results checked afterwards). If no such option exists, all 600 DPI (and better) scans will be run through a proper de-screening process. I have had excellent results with the Sattva Descreen plugin and endorse it for this. Descreening screened material not only improves the quality of screened images by removing the screening pattern, but results in smaller files (no matter the compression method) due to what is effectively noise reduction.
  • Mild degradation of images is appropriate as long as the text legibility itself is preserved. (Acrobat and DjVu can both do this, although some repositories aren’t accepting DjVu any more.)

To achieve these goals at the highest legibility but the smallest file size, I follow these practices:

  • Destroy the magazines. If you cut the binding off, you have flat sheets that you can run through an ADF or sheet-fed scanner. You can cut very close to the binder glue, giving the inner printing a change to be scanned. It’s a sacrifice, but I feel preserving information printed on paper is more important than preserving the paper. I bought a guillotine paper cutter for $120 specifically for this purpose.
  • Use a high-quality sheet-fed duplex scanner with a configurable TWAIN driver. Usually people think of the Fujitsu ScanSnap series for this, and that was what I first purchased, but the ScanSnap series’ software is not configurable, and it’s only 9 inches wide which prevents scanning some material. I was lucky enough to acquire a Fujitsu fi-series scanner second-hand. This line of professional office scanners have an extremely configurable TWAIN driver that allows groups of settings to be saved into profiles appropriate for various kinds of material. And while it’s not a photo scanner, it does a more than acceptable job of scanning color magazines (better than the ScanSnap, which always has washed-out colors). Would I use it for scanning photos or artwork? No, but it’s my first choice for scanning entire books or magazines. This can be a case of spending some real money, but you do get what you pay for.
  • Pay for Acrobat. Real, commercial Acrobat supports JPEG2000 compression, which outperforms JPEG in both size and quality. But more importantly, it has a feature that can drastically reduce large PDFs called Adaptive Compression. It works by separating text and line drawings on a page into their own monochrome layer that is compressed losslessly. Then, the image that remains after the text has been lifted is downsampled and recompressed. This results in much smaller files without compromising the legibility of text and the sharpness of line drawings. (This feature may have been inspired by DjVu, whose early claim to fame was doing exactly this.) Finally, commercial Acrobat can perform OCR without requiring additional software.

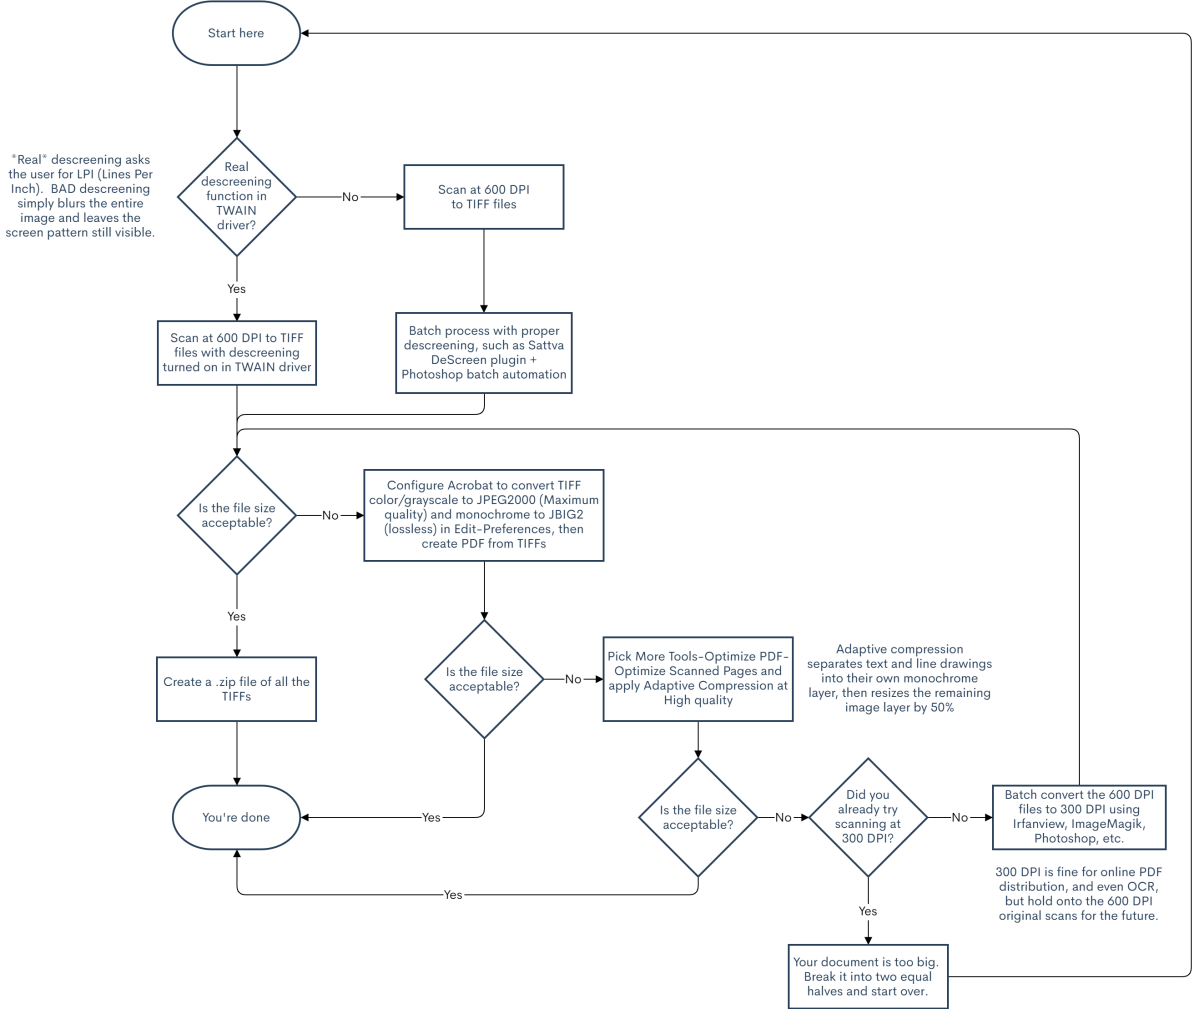
With those rules and methods set, I performed many tests with a lot of material, and came up with a set of best practices that met my criteria. I compiled those practices into a handy flowchart:

I’ve continued to put this flowchart into practice with a lot of material, including mixed-content manuals (color, grayscale, and B&W material in the same manual), 500-page color screened magazines, 8.5×11″ photocopied material, dot-matrix printouts, and printed books. In all cases, I follow the flowchart until the size is reasonable for the material, and I’ve never been disappointed or felt like I was giving up too much quality for the file size. (What is “reasonable” is different for everyone according to personal preference, goals, and motivation, so it’s up to you to determine what that size eventually is.)

I hope that this information will help you finally tackle your own stacks of magazines that, like me, have been leering at you ominously for years from the various corners of your abode.

Posted in Lifehacks, Technology | Tagged: , , , | 14 Comments »